
Suppose you have a scenario where you want to pass parent record id i.e., an account id from related list button of contact to lwc. In this article we will learn How to Pass Parent Record ID from Related List Button to LWC in Salesforce and display it inside lightning web component.
Usecase
Let’s say you have a custom button on a related list (like Contacts under an Account), and when clicked, it should open a page or component that automatically receives and displays the Account ID (i.e., the parent record).
LWC Component
lets create an LWC Component named testRelatedListComponent.
testRelatedListComponent.js
import { LightningElement, wire, api } from 'lwc';
import { CurrentPageReference } from 'lightning/navigation';

export default class TestRelatedListComponent extends LightningElement {
    @api recordId; // This will hold the final 18-digit Account ID

    // Use wire service to get the current page reference (URL state)
    @wire(CurrentPageReference)
    setRecordIdFromUrl(currentPageReference) {
        // Extract the 15-digit Account ID from URL parameter 'c__accountId'
        const id15 = currentPageReference?.state?.c__accountId;
        if (id15) {
            // Convert it to 18-digit and assign it to recordId
            this.recordId = this.to18DigitId(id15);
        }
    }

    // Utility method to convert a 15-digit Salesforce ID to an 18-digit one
    to18DigitId(id15) {
        if (!id15 || id15.length !== 15) return id15;

        const suffix = 'ABCDEFGHIJKLMNOPQRSTUVWXYZ012345';
        let flags = '';

        // Loop through the ID in chunks of 5 characters
        for (let i = 0; i < 3; i++) {
            let flag = 0;

            // Check each character in the 5-character chunk
            for (let j = 0; j < 5; j++) {
                const char = id15.charAt(i * 5 + j);

                // If the character is uppercase, update the flag bit
                if (char >= 'A' && char <= 'Z') {
                    flag += 1 << j;
                }
            }

            // Add the corresponding character from the suffix to flags
            flags += suffix.charAt(flag);
        }

        // Return the original 15-digit ID plus the 3-character suffix
        return id15 + flags;
    }
}
testRelatedListComponent.html
<template>
    <lightning-card title="Test Related List Component">
        <div class="slds-m-around_medium">
            <template if:true={recordId}>
                <p><strong>Account Id from URL:</strong> {recordId}</p>
            </template>
            <template if:false={recordId}>
                <p>No Account Id Found in URL.</p>
            </template>
        </div>
    </lightning-card>
</template>
testRelatedListComponent.js-meta.xml
<?xml version="1.0" encoding="UTF-8"?>
<LightningComponentBundle xmlns="http://soap.sforce.com/2006/04/metadata">
    <apiVersion>64.0</apiVersion>
    <isExposed>true</isExposed>
    <targets>
        <target>lightning__RecordAction</target>
        <target>lightning__RecordPage</target>
        <target>lightning__UrlAddressable</target>
    </targets>
    <targetConfigs>
        <targetConfig targets="lightning__RecordAction">
            <actionType>ScreenAction</actionType>
        </targetConfig>
        <targetConfig targets="lightning__RecordPage">
            <property name="recordId" type="String" label="Record Id" description="Record Id"/>
        </targetConfig>
    </targetConfigs>
</LightningComponentBundle>
Create a List Button on Contact
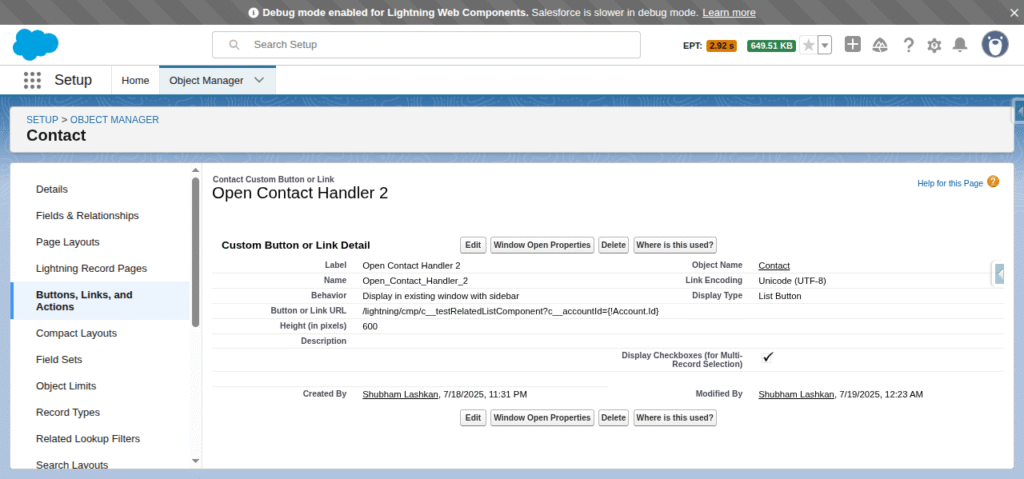
Go to Setup → Object Manager → Contact → Buttons, Links, and Actions, and create a new List Button:
- Type: List Button
- Behavior: Display in existing window without sidebar or header
- Content Source: URL
- URL:
/lightning/cmp/c__testRelatedListComponent?c__accountId={!Account.Id}
Have a look at the below screenshot.
Add the Button to the Account Page Layout
- Go to Object Manager → Account → Page Layouts
- Edit the layout
- In the Contacts related list, click the wrench icon
- Go to Buttons tab, add your new button and save.
Now, when users click the button from the Contacts related list on an Account, your LWC will open and receive the correct Account ID.
I hope you found this article helpful.
Also Read: Pass Parent Record Id to LWC using Aura Wrapper
Learn LWC from here